Using the Snap.svg Library To Manipulate SVGs with Javascript

An SVG image is a type of XML, just like HTML is a type of XML. Web developers have taken Javascript and the fundamental ideas of XML and the Document Object Model (DOM) and have created a kind of a Cambrian era for Javascript libraries; there's a huge diversity of Javascript tools for doing (almost) anything on the web. A lot of people use the Raphael Javascript library for manipulating SVG files, and now there's an open source library from Adobe called Snap.svg.
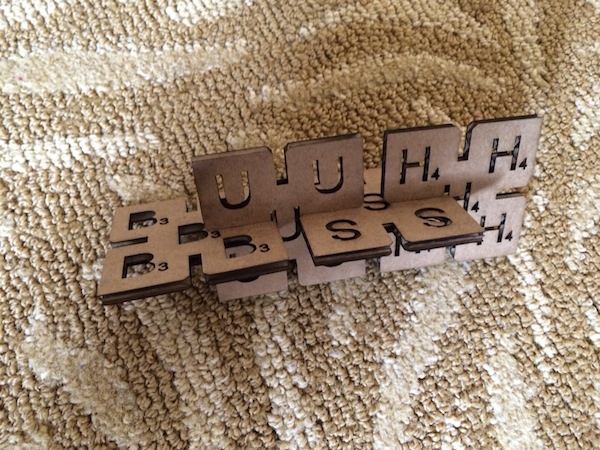
I'll show you a quick example of getting up and running with Snap.svg. You can use it to generate SVG images algorithmically, or (as in this example) you can use it to manipulate an SVG created in a vector drawing program. In this tutorial we manipulate an SVG drawing of a pressfit tile created in Inkscape. The impetus for this was a week 3 Fab Academy project by Aisha Jandosova. Aisha's idea was to create Scrabble-type tiles that could be assembled in 3 dimensions and cut on the lasercutter in pressfit fashion (the game could be called "Fabble").
Note that this example was created as part of the evolution of that project, and won't make the final version of Fabble. See the link above for that file.
Installing Snap
- Download and unzip the library from snapsvg.io.
- On the Mac, create a new directory in /Users/username/Sites/MakeFabble/. On Linux, make it in /home/username/public_html/MakeFabble/.
- Because this is Javascript, you'll need to serve up the page from a web server for it to work (you can't just use "Open File" in your browser). Make sure your local web server is running; this used to be simple on the Mac (a checkbox in Settings->Sharing). It's still simple, but you need to open a Terminal and type
sudo apachectl start
(same thing on Linux). To always start your local web server on a Mac, trysudo defaults write /System/Library/LaunchDaemons/org.apache.httpd Disabled -bool false
- Make a subdirectory in MakeFabble called js, then unzip the Snap libray there. It doesn't have to be in a subdirectory, but that's how this tutorial is set up.
- Check to see if the web server is running by visiting: http://localhost/~yourusername.
A Simple Snap example
Download the sample pressfit tile SVG that we'll be working with. Save it in the MakeFabble directory. Open it in a text editor and you'll see the XML:

Now open the SVG image in a browser. Use the URL:
http://localhost/~username/MakeFabble/
If you've set up everything correctly, this should pull a directory listing of the /Users/username/Sites/MakeFabble directory (/home/username/public_html/MakeFabble on Linux). The ~ is a Unix shorthand for your home directory
Chrome has some great web developer tools built in (Safari and Firefox do as well). In Chrome, go to Developer->Developer Tools, which will open up a panel showing you how the web browser has interpreted the SVG file. Each nested XML element is a node in a tree called the Document Object Model; you can see it on the left side of the panel:
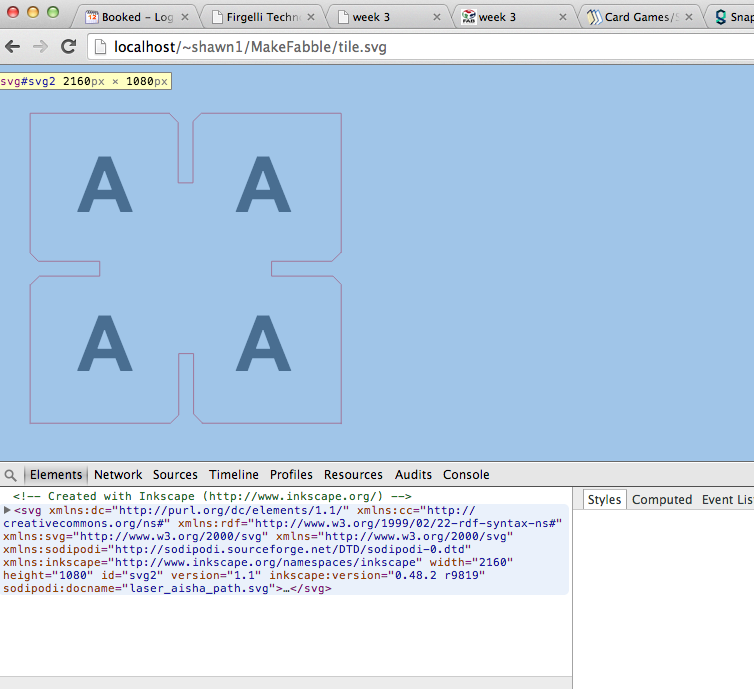
Click on the elements expand them and you'll start to see how an SVG image is structured. Inkscape saves each layer of the image in a single <g> element. You'll also notice that each element has a unique id; the
Next we'll set up a simple HTML file that will execute the Javascript. You can think of this HTML page as a kind of SVG editing tool; we'll be reading in an SVG file, manipulating it, then printing out the manipulated SVG file. Create a new HTML file called MakeFabble.html in the MakeFabble directory and paste the following HTML in it:
<html>
    <head>
        <title>Make Fabble</title>
        <script src="js/snap.svg-min.js"></script>
    </head>
    <body>
        <script>
            var s = Snap("24in","12in");
            Snap.load("tile.svg", function (f) {
                var g = f.select("g");
                s.append(g);
            });
        </script>
    </body>
</html>
Let's look at some of the Javascript. This line loads the Snap.svg library:
<script src="js/snap.svg-min.js"></script>
Make sure you've put it in a subdirectory called js. If you don't see anything on the screen, check the Javascript Console in the Developer tools.
The body of the HTML document is generated by the Javascript script. The line:
var s = Snap("24in","12in");
sets up a new Snap object with dimensions 24x12 inches (same as the laser bed). You can think of this as a new SVG image, to which we can add new nodes or elements. To start, the SVG is an empty canvas. The next line:
Snap.load("tile.svg", function (f) {...});
loads an existing SVG image into memory and parses it so that Snap has an internal representation of all of the elements. The two arguments to load are the filename and a callback function that is executed when the file has finished loading. The callback function is just two lines:
var g = f.select("g");
s.append(g);
The first selects the first element of type 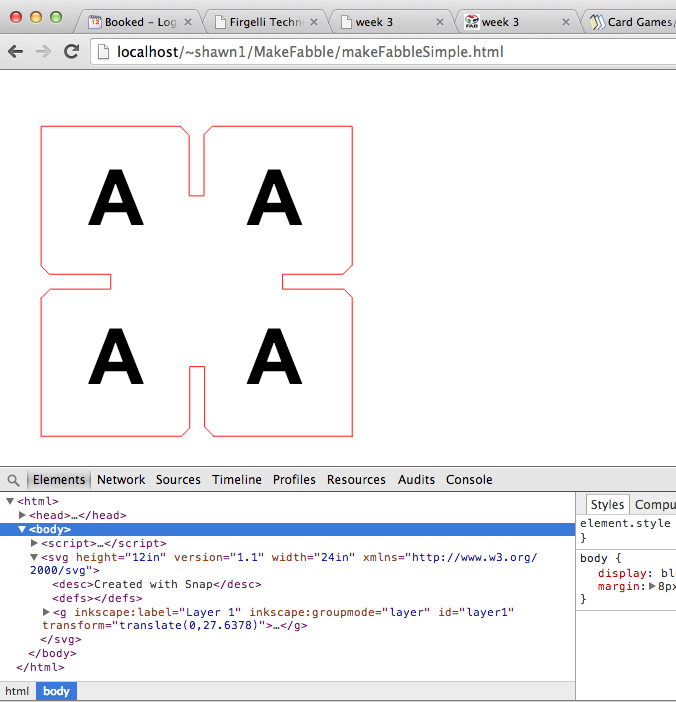
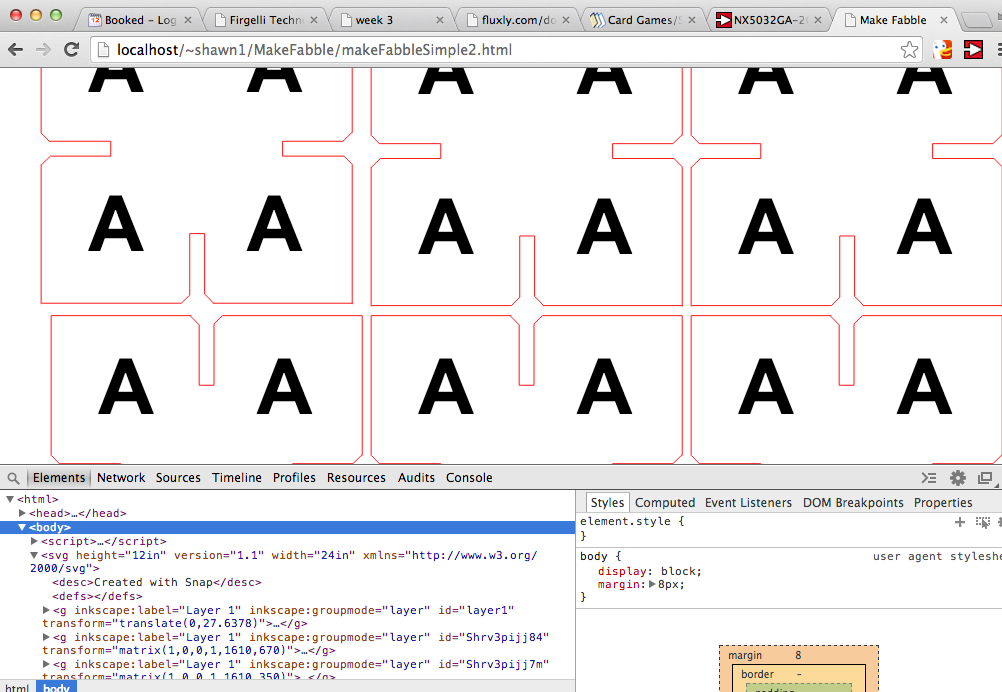
Creating Tiled Multiples
Let's expand on the simple example to create a grid of 3x6 tiles:
<html>
    <head>
        <title>Make Fabble</title>
        <script src="js/snap.svg-min.js"></script>
    </head>
    <body>
        <script>
            var s = Snap("24in","12in");
            Snap.load("tile.svg", function (f) {
                var g = f.select("g");
                s.append(g);
                var width = 320;
                var height = 320;
                var cols = 6;
                var rows = 3;
                for ( i=0; i<cols; i++) {
                   for ( j=0; j<rows; j++) {
                      if (i || j ) {   // skip the first cell
                         var h = g.clone();
                         var x =i*width+10;
                         var y = j*height+30;
                         var tstr = "translate("+x+","+y+")";
                         h.transform(tstr);
                      }
                   }
                }
            });
        </script>
    </body>
</html>
This is the same idea; an empty canvas is created, the template is read and the layer is grabbed from it. Then a pair of for loops iterates over the rows and columns, and a new node/element is cloned from the original (the variable h here). The transform() Snap function changes the transform attribute of an element to a given string. Here the string is built up in a coupl eof steps due to the way Javascript handles strings and numbers. Note that the width and height can actually be grabbed from the attribute of the original SVG file if you like.
Adding JQuery
If you've developed for the web, chances are you have used JQuery, a hugely popular convenience library. In fact Snap.svg is often called "JQuery for SVG." Because SVG is XML, you can also use JQuery to manipulate the elements of an SVG file. Download JQuery if you don't have it, then put it in the js directory next to Snap.svg. Include JQuery in your HTML file using:
<script src="js/jquery-1.10.2.min.js"></script>
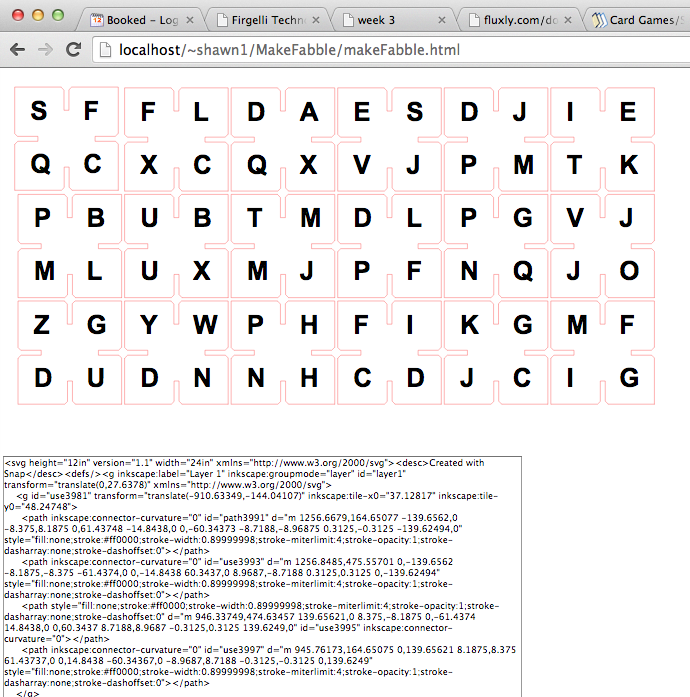
In the example of Fabble, we wanted to replace all of the placeholder "A"s with random characters. The following example does that:
<html>
    <head>
        <meta charset="utf-8">
        <title>Make Fabble</title>
        <style>
        </style>
        <script src="js/snap.svg-min.js"></script>
        <script src="js/jquery-1.10.2.min.js"></script>
        <script>
            var objects = {};
            $(document).ready(function () {
            });
        </script>
    </head>
    <body>

        <script>
            var width = 320;
            var height = 320;
            var cols = 6;
            var rows = 3;
            var s = Snap("24in","12in");
            Snap.load("tile.svg", function (f) {
                      var g = f.select("g");
                      s.append(g);
                      for ( i=0; i<cols; i++) {
                         for ( j=0; j<rows; j++) {
                            if (i || j ) {   // skip the first cell
                               var h = g.clone();
                               var x =i*width+10;
                               var y = j*height+30;
                               var tstr = "translate("+x+","+y+")";
                               h.transform(tstr);

                               $( "tspan" ).each(function( index ) {
                                     $(this).text(getCharacter());
                                });
                            }
                         }
                      }
                      $("#code-block").text(s.outerSVG());
                      });

            function getCharacter() {
                return String.fromCharCode(65+Math.floor((Math.random()*26)));
            }
        </script>
    <textarea cols="100" rows="100" id="code-block">
    </textarea>

    </body>
</html>
I won't go into JQuery here, but the key line is:
$( "tspan" ).each(function( index ) {
    $(this).text(getCharacter());
 });
This iterates over each
Finally, the line:
$("#code-block").text(s.outerSVG());
Grabs the SVG XML from the generated SVG and plops it in the text area with id "code-block" at the bottom of the page. Because this is a web page there isn't an easy way to write to the filesystem (I'm actually sending it to a CGI program like you would do in 1996). Just select all in the text area, copy and paste into a text editor to save the new SVG file.
Here's the final output:
There's much more that you can do with Snap.svg; if you build on this introduction, send me a link and I'll put it here!
Tutorial by Shawn Wallace -- Fab Academy AS220 Providence, RI - Last Updated February 2014